Welcome, Guest. Please login or register.
May 20, 2024, 02:12:02 PM

Login with username, password and session length

Recent Topics

[Today at 01:59:09 PM]

[Today at 12:55:22 PM]

[Today at 11:45:50 AM]

[Today at 10:19:49 AM]

[Today at 09:05:07 AM]

[Today at 05:58:28 AM]

[May 19, 2024, 10:48:03 PM]

[May 19, 2024, 10:38:11 PM]

[May 19, 2024, 10:21:04 AM]

by Clb
[May 19, 2024, 09:23:49 AM]

[May 19, 2024, 07:12:15 AM]

[May 18, 2024, 07:33:15 PM]

[May 18, 2024, 07:29:46 PM]

[May 18, 2024, 04:56:39 PM]

[May 18, 2024, 12:06:29 PM]

[May 18, 2024, 07:37:45 AM]

[May 17, 2024, 11:20:54 PM]

[May 17, 2024, 08:41:33 PM]

[May 17, 2024, 07:13:03 PM]

[May 17, 2024, 09:32:27 AM]

[May 17, 2024, 07:00:12 AM]

Support NCKA

Support the site by making a donation.

Show Posts

This section allows you to view all posts made by this member. Note that you can only see posts made in areas you currently have access to.


Topics - SBD

Pages: [1] 2
1
AOTY / Bluesky eligble?
« on: December 26, 2018, 05:24:39 PM »
Kinda interested in one of these.

Noticed they have been allowed in other yak events and tourneys.

Doesn't look like a yak, but not really any different than a Hobie with an ama either.

Can I get a ruling?


2
General Talk / Jim Sammons giving seminar at Clavey this Sunday
« on: September 22, 2015, 12:47:41 PM »
Jim Sammons and I will be afternoon at Clavey headquarters this Sunday. This is a great opportunity to meet JK team members who will share the joys and secrets of kayak angling with you!

You’ll also have the opportunity to see the most popular Jackson kayaks set up for fishing and discover different ways of how to utilize the leading fishing kayak to improve your game.

    Space is limited, sign up now to reserve your spot ! 
    First 5 sign ups will receive a free Jackson hat.
    This is not to be missed!

Time: 1:00PM - 4:00PM, September 27th
Location: Clavey Paddlesports
Cost: FREE

Hope to see you there!

3
For Sale / New 2014 Revo SOLD SOLD SOLD
« on: February 24, 2015, 07:51:05 PM »
This is the AOTY prize boat I recently won. Its a beautiful yak.

Never been wet, and includes everything you'd get if you bought one at a store except tax  :smt003

I want to send Paige to Europe after she graduates, I have enough boats...so its on the block.

$1850

4
Gearing Up and Rigging Up / Coosa Drift Anchor
« on: January 31, 2015, 08:44:25 AM »
With steelhead season upon us it was time to make a anchor system for the Coosa.  While the Coosa comes equipped with an anchor system stock, I wanted to upgrade it to something with more holding power.

The first step was to figure out how to mount the roller system.  After looking around the aft of the yak, I decided to remove the rear handle and use the threaded inserts.

Once the rear handle was removed,  I modified a piece of 1" x 3/16" flat stock to fit where the handle used to live.  This will serve as the base.  I reused the stock screws to secure it.


The next step was to make an arm for the roller.  Last season I made a temporary anchor mount for the Coosa that came straight off the back of the boat.  The straight mount and angled line routing lead to binding and friction that was no joy to use.  For this mount I wanted to make an arm that went with the flow of the stock anchor line routing.  This would allow me to use the really nice routing guides without binding. 

Some drift boats accomplish this by having an offset arm.  I decided to try this approach.  I cut a piece of 1 1/4" x 3/16"  flat stock at an angle that would flow with the line but put the anchor end of the arm on the centerline of the hull.


I also wanted to make sure the arm was tipped upwards enough to keep the anchor out of the water.  Once I was happy with the fit of pieces I tacked them in place.


I then got a $8 pulley from TSC to serve as the roller.  I have been using these for years and they work great. 


I cut off everything but the side plates and roller and welded it to the arm. Please note: ALL MAJOR WELDING HAPPENS ON THE BENCH.  WELDING ON THE YAK WILL MELT YOUR BOAT (ASK ME HOW KNOW :smt013)

Shazam!


I painted the assembly and mounted it all up for good.  The fit and alignment looked good and unlike my earlier attempt this setup was SMOOOOOTH thru the guides.


The very next week I had a chance to drift the Russian on the MLK holiday with a great cadre of old school NCKA. Near the mid point of drift I felt the "tap" we all wait for and swung.  The rod loaded and I was happy!  I worked the yak into an eddy and dropped anchor.

Holy Toledo was kind enough to document my success.


After a few too many photos, we sent this chunky girl back on her way.


5
For Sale / Jackson Cuda 14 *SOLD*
« on: November 14, 2014, 10:04:28 PM »
Need to make room on the trailer so the Cuda is moving on. 

New in 2013.  "Limon" color.


Rear RAM balls were replaced with flushmounts and then Yak Attack track was added to give you four rod holders behind the seat...


Up front are two more rod holders.  The boat is pre-rigged for a Dragonfly (including transducer) so if you want add electronics all you need is a head unit.  If you want me to remove the transducer I'd be glad to do that too.


Its been a mighty lucky boat for me!


6
Gearing Up and Rigging Up / Jackson Kraken Dragonfly install
« on: November 12, 2014, 11:01:47 AM »
I recently got a Jackson Kraken.  Here's how I added my Raymarine Dragonfly to the yak.

First step was to flip the boat over and place the Dragonfly transducer into the transducer scupper.  Then trace the footprint of the transducer in the scupper using a Sharpie...


The get out the kayak lazer gun (ok its actually just a hot glue gun) and let it get good and hot.  Apply a good bit of hot glue into the area where the transducer contacts the hull and quickly embed the transducer.  Then while the glue is still hot, add more glue above the transducer to "capture it" in hot glue...


Wait about five minutes and then flip her over.  Every kayak has a goofy feature.  This kayak has a well-intended but totally useless drink holder bungee.  Cut it out!


Seal the holes with your lazer...


Now drill a hole for the transducer cable...


Seal the hole with a Wire Cap...


Put a little Goop into the backside of the wire cap to seal and minor openings...


Put a small bead of hot glue onto the transducer cable and press it into the recess around the hatch perimeter to secure the cable high and out of the way for tangle free rod stuffing...


Repeat every few inches until its all high and tight...


After looking at a number of ways to get the cable thru the hull and to the head unit I decided to use the hinge clamp plate as the "wire cap".  Carefully mark the front edge of the hinge clamp plate and then disassemble the clamp.


Then drill a hole for the transducer cable.  Place the hole so that only a small portion of the hole is exposed when the clamp plate is reinstalled.  This small gap is where the wires will pass thru while the clamp plate will cover the majority of the large hole required to pass the cable end thru...


Pass the wire thru and Goop all of the clamp holes...


Reinstall the clamp and then open the hatch.  Seal the backside of the pass thru with more Goop.  Then install a pair of cable organizers to the bottom of the hatch under the clamp plate...


Coil your transducer cable and zip tie it into place using your cable organizers...


Route the power cable that is integrated into the transducer cable forward into the battery tray that is under the front hatch.  Trim to length and install terminal ends...


Install battery...


Done with the hard part (which was actually really easy).

For installing the head unit I wanted to come up with some kind of sturdy base.  I used Ram balls on my Cuda and it was always too wiggly for my liking.  Unfortunately the Dragonfly base is too big for direct mounting.  It would contact my trucks roof when on my roof rack.  How to have a rigid mount yet totally removable....HMMMMmmmm.  I stared at the tracks, my assortment of Yak Attack gear but nothing quite worked.

So I sketch up an idea for a mounting plate and sent it to Luther Cifers at Yak Attack.  He is a great guy and a fishing buddy. A few emails later this showed up at my house... :smt007 :smt007 :smt007


I mounted the Dragonfly base to the pre-drilled plate using the supplied screws...


Screwed on the saddle...


And slid the assembly onto the hatch tracks...BOOOOOM!


The whole set up is super clean and very easy to strip off for transport or surf launching...


As fishing yaks progress it has become easier and easier to rig them.  This was super easy and I love the results...


And it works beautifully :smt003...


7
Got the day off and I wanna bloody the new yak!

8
Jackson Kayak / More Kraken porn...
« on: August 01, 2014, 07:47:44 PM »

9
For Sale / Extrasport Paddle pants and jacket
« on: February 03, 2014, 07:20:06 AM »
Breathable combo.  Great over layer for splash and wind but not for sustained heavy rain (BTDT).  :smt001 Gasketed sleeves and neoprene waist.  These are nicely styled and a cool color.  XL $80 for the pair.

10
For Sale / NRS farmer with relief zipper
« on: February 03, 2014, 07:16:17 AM »
Light weight super flexible farmer paddling suit with relief zipper.  Very light use. Size XL-$40

11
For Sale / Kokatat Dry Suit
« on: February 03, 2014, 07:13:52 AM »
I've had this for about 4 years and just never wear it.  Its been worn maybe 3 times.  I am a 2-piece guy.

Fits 6' to 6-4 200-240.  Sleeve gaskets and zippers are perfect.  Color is also perfect but looks weird in this cell pic. I removed the neck bungee to improve comfort.   

A bargain @ $325

12
For Sale / Trident 11 with drift anchor
« on: November 17, 2013, 05:39:25 PM »
T11 with mod pod, flush mounts, scotty, and complete drift anchor set up.  KILLER steelhead and salmon rig

650 obo

13
For Sale / Trident 11 Angler with drift anchor
« on: August 01, 2013, 03:03:58 PM »
Time for a new river yak.  This little boat has been dynamite...lots of mojo!

$650 for hull, stock seat, anchor system, and anchor.


14
I recently got a Jackson Cuda and was in need of electronics.  I had a HUmminbird 383 laying around so I thru it on for the maiden voyage.  Then I remembered why I never loved the 383...the screen is just too dang small, and if you run it in split screen (my preferred view) its two slices of nothing!

I have all Raymarine stuff on my skiff and was looking for something of equal mojo but in a kayak friendly size.  Along comes the Raymarine Dragonfly.  Everything I wanted as well as downscan.

I got my hands on one, and was stoked to get it on the Cuda ASAP.

So how much bigger is the screen?  A lot!  However the overall housing size isn't that much different...


I ordered a  Ram 1 inch ff kit, a Ram Dragonfly adapter, 2 pin trailer harness, and a wire cap from OEX and went to work...


The Ram adapter bolts right to the Dragonfly mount...


And it all goes together from there...


I then removed the 383 from the center hatch and mounted the Ram base.  I converted the old 383 holes to cable management loops...


Converted the power cable to match my LiPO battery pack...


Attached some nylon straps and buckles to hold my batter pack...


Sha-zam...


Onto the transducer.  Over the years I have gotten lazy.  Slow cure hot glue is MONEY.  Place, trace, and done...


Passed the cable thru a scupper under the seat, thru a wire seal, and into the hull.  I also used a few dabs of hot glue to secure the cable under the seat...


Off to test.  First impressions: huge, bright, incredible resolution and great menu...


Generous split screens...


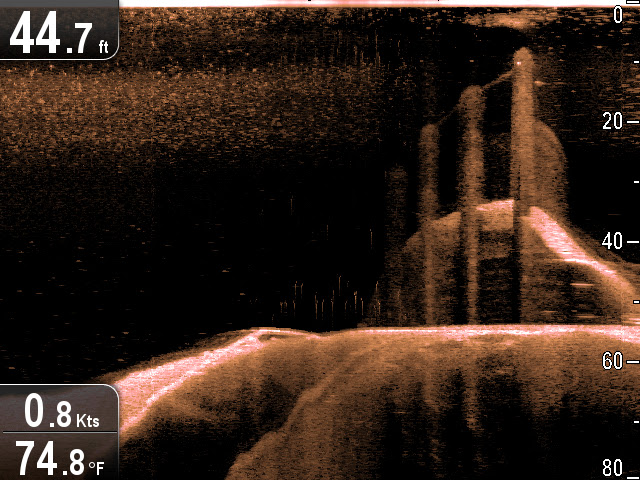
Downscan is nothing short of holy crap!!!!  Look at these screenshots from the Mendo control tower...


Can't wait to try it on the salt.  Standby for updates.


15
For Sale / Ocean Kayak Kea
« on: March 05, 2013, 03:02:44 PM »
This was Paige's personal killing machine...but all my kids have out grown it.  Includes kids sized seat, Werner "sprite" kids paddle, and two flush mounts. 

$350

Pages: [1] 2
anything